Breaking

Friday, June 26, 2020

June 26, 2020

The New Google Photos Is All About Your Memories

Google has released a new version of Google Photos. And it’s all about your memories. The Google Photos redesign helps you relive the treasured moments you have captured on film. With a simpler UI, an expanded search function, and a new interactive map.

Google Taps Into Your Treasured Memories

Google Photos is a fairly simple app. You shoot photos and videos on your smartphone, and they’ll be stored in Google Photos. You can edit them in a few simple ways, but Google Photos is, at its core, all about storing your treasured memories.

In September 2019, Google added Memories to Google Photos. This used the stories format familiar to social media users to put “your memories front and center in Google Photos.” And now, Google is making it the focus of Google Photos.

How to Use the New Google Photos Features

Your memories are the key to the new Google Photos. Which is now focused on helping you save, find, view, and share those memories. This has helped shape everything from the user interface to the newest feature, which is a (much-requested) interactive map view.

First up is the UI, which has been simplified into a three-tab structure. There’s the main Photos tab containing all of your photos and videos, a Search tab allowing you to search for people, places, and things, and a Library tab with Albums, Favorites, etc.

The Memories feature has been expanded. So, as well as reminding you of where you were and what you were doing on this day years ago, Google Photos will now highlight the best photos of you and your friends, trips taken, and even highlights from last week.

Google has also added a new interactive map view to the Search tab. This, which Google claims to be one of its most-requested features, lets you explore your photos via a map. As you pinch and zoom around the globe, you’ll reveal your photos from different locations.

Even iOS Users Should Use Google Photos

Smaller changes to Google Photos include a new logo, which is a simplified form of the original pinwheel design, and the automated creations such as stylized photos and collages moving from the For You tab (which no longer exists) into Memories.

The new Google Photos is rolling out now on Android and iOS. So if you can’t yet see the new UI and features, keep an eye out for an update. And if you’re an iOS user who hasn’t yet made the switch, here are our reasons to use Google Photos over iCloud Photos.

Read the full article: The New Google Photos Is All About Your Memories


from MakeUseOf https://ift.tt/2VhpwEA
June 26, 2020

How to Record Your Screen and Stream With OBS Studio

record-stream-obs

If you’re looking to record your screen or stream online, OBS Studio (formerly Open Broadcaster Software) is a great option. This tool makes it simple to capture screencasts, record your gameplay, stream to Twitch, and much more besides.

However, if you’ve never used it before, OBS Studio might seem a little daunting at first. In this guide, we’ll show you how to set up OBS Studio, what you need to start recording and streaming, and tips for getting the best results.

Download OBS Studio

To get started, you’ll want to download OBS Studio for Windows, macOS, or Linux. We’ll use the Windows version for this tutorial, but it’s similar across all platforms.

OBS Studio is truly free, so you don’t have to pay for any features. It’s also open source software, meaning anyone can look at the code and improve it. This is the case with a popular spin-off: Streamlabs OBS.

Download OBS Studio

Step through the standard installer. Once it completes, OBS Studio will offer to walk you through an auto-configuration wizard. You can do this if you like; we’ll review relevant settings below, though.

How to Use OBS Studio: The User Interface

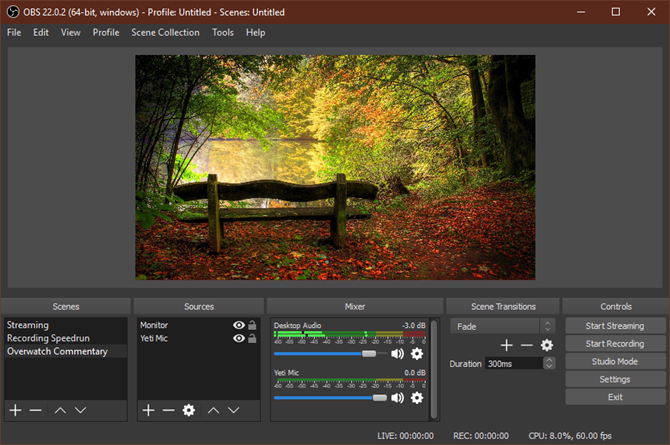
The main OBS Studio interface allows you to set up everything you need to start streaming or recording. At the bottom of the screen, you’ll see several control elements.

OBS Main Window

Scenes

A Scene in OBS Studio allows you to collect and arrange certain Source elements in a specific way. You can have multiple scenes and switch between them at will.

This will make a bit more sense as we move on. For now, you can click the Plus button to create a new scene. Call it Default or something similar (you can change it later).

After you’ve added some elements, you can click on them in the preview to adjust as you wish. Click the Eye icon to hide an element, or the Lock to prevent accidental movement.

OBS Scenes

Sources

Sources are the video and audio inputs that you feed into OBS Studio. Click the Plus button to add a new one, and you’ll see several categories. The most important ones include:

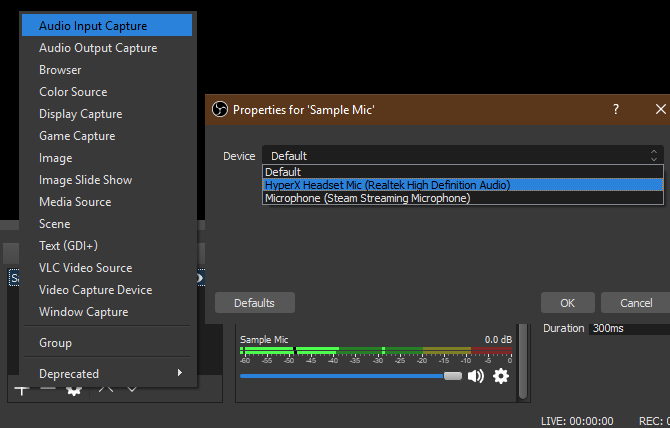
  • Audio Input Capture: Record sound from a microphone or similar. (See the best microphones for podcasting if you need one.)
  • Audio Output Capture: Capture the sound coming out of your computer, so that your recording/stream includes game or desktop audio.
  • Display Capture: Allows you to capture an entire monitor, no matter what’s showing on it.
  • Game Capture: Choose a specific game to record.
  • Image: Display a static image.
  • Video Capture Device: Records footage from a webcam or similar. (We’ve listed the best budget webcams if you don’t have one already.)
  • Window Capture: Record a specific program window. This is like Game Capture, but works for any program.

Once you select an option, you can choose Create new or Add Existing. Since you just started, you’ll need to add a new item that you can reuse later. After you click OK, OBS Studio displays options depending on the source you chose.

As an example, click Audio Input Capture. Let’s say you’re going to use a headset microphone to record audio. Enter a descriptive name for the source (like Headset Mic) and click OK. On the resulting screen, pick your headset mic from the Device dropdown and click OK.

OBS Add Audio Source

Now, you have that input registered with OBS Studio and can easily add it again in the future. You’ll need to repeat this step to add your webcam, screen capture, and similar.

Audio Mixer

Once you’ve added all of your sources, the Audio Mixer tab lets you adjust the volume balance between them. The bars move in real-time to reflect levels. Drag the slider to adjust the mix, or click the speaker icon to mute one. You’ll find more options by clicking the Gear icon by a source.

OBS Audio Mixer Options

You should definitely test these ahead of time, as different sources can have vastly different volume levels. You wouldn’t want to complete a recording only to find out that the game volume overpowers your mic audio.

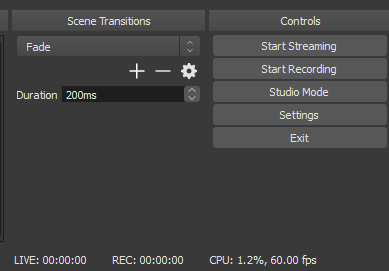
Scene Transitions

This simple section allows you to choose what happens when you swap between scenes. Choose between Fade and Cut in the dropdown box, or hit Plus to pick another option. You can choose how long the transition lasts using the Duration box.

Controls

OBS Transitions and Controls

Here, the Start Streaming and Start Recording buttons will let you start capturing footage with OBS Studio. You can see the current FPS and CPU usage below.

It also lets you enable Studio Mode for making changes to scenes on the fly, plus access to the many Settings of OBS Studio.

The Best OBS Settings to Use

Before your first recording or stream, you should tweak a few options. Click Settings in the Controls section of the interface to access them.

OBS Studio offers other options than what we explore here, but you shouldn’t need to worry about those until you’re more experienced with recording and streaming.

Video Settings

First, head to the Video tab. Here, check the Base (Canvas) Resolution and Output (Scaled) Resolution) options.

The first should match your screen resolution, while the second lets you choose the resolution of the final video. Leave Output the same as Base for a full-quality recording, or lower it to something like 1280×720 for a lower file size. Leave the Downscale Filter as Lanczos if you’re downscaling.

OBS Video Settings

Lastly, you’ll need to choose the FPS (frames per second) of the recording. For a smooth picture, choose 60. But if you desire a smaller file size or are recording something simple, 30 is suitable.

It’s also a good idea to open the Advanced tab and set Process Priority to High. This will give OBS Studio the most resources so it can create the best recording.

The Best OBS Settings for Recording

Switch to the Output tab to access options related to screen recording—make sure you’re looking in the Recording section, not Streaming.

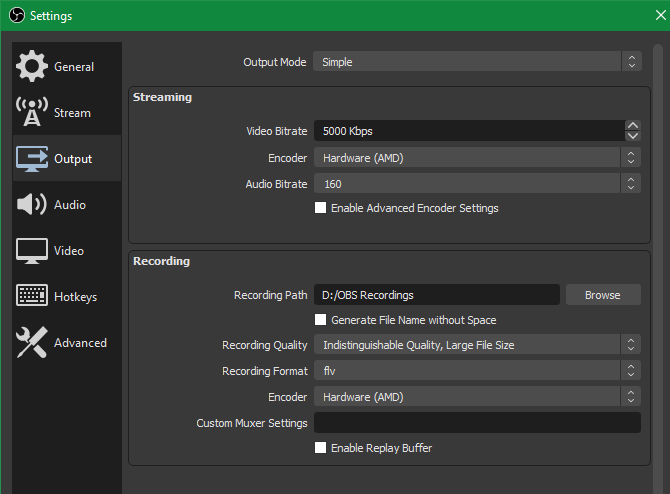
At the top, you can set the Output Mode to Simple or Advanced. If you want a quick and solid preset, pick Simple and set the following under Recording:

  • Recording Quality to Indistinguishable Quality
  • Recording format to FLV, or MKV if you prefer
  • Encoder to Hardware (AMD) or Hardware (NVENC) if you have a powerful graphics card. Use Software (x264) if not (see below for more details).
  • Recording Path to a place of your choosing; this is where your completed OBS video will go.

OBS Output Options

Under Recording Format, you can choose the video file type to save in (see different video file types, explained for help). The default is FLV, which is fine in most cases. While MP4 is a popular video format, using it is risky because you’ll lose the whole file if OBS Studio can’t finalize it. Thus, a blue screen or power outage would destroy an MP4 recording, but merely cut it off if you’re using FLV.

Below this, you’ll need to choose an Encoder. The default is Software (x264), which uses your CPU. If you have a powerful dedicated graphics card (not integrated graphics), you should change this to Hardware (AMD) or Hardware (NVENC), depending on your card. Doing so will likely provide better results when recording, as it won’t put as much strain on your CPU.

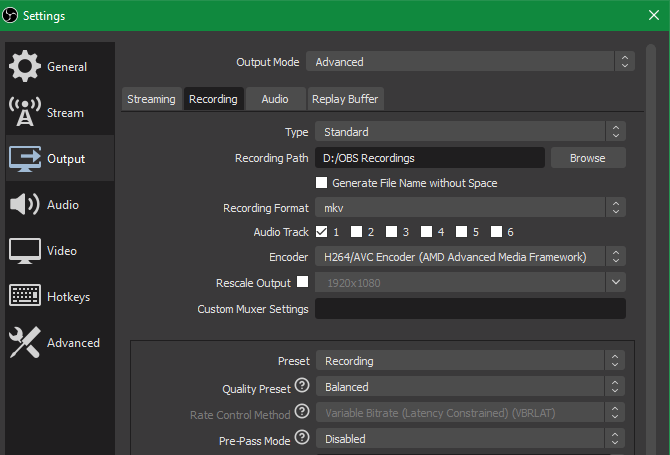
Of course, Advanced gives you more options if you’re comfortable with that. Choose Advanced and swap to the Recording tab below to see them.

What Bitrate Should I Use?

If you switch to Advanced in the Recording panel, many of the additional options relate to the bitrate. This is a vital part of your recording setup. Essentially, a higher bitrate results in better-quality videos with larger file sizes. Setting bitrate too low will result in pixelated video, while setting it too high will generate a massive file.

Thankfully, if you’re using a graphics card encoder, OBS provides a few options to try using the Preset box. Try Recording if you don’t need particularly high quality, and up it to High Quality Recording if that’s not good enough. Indistinguishable Recording and Near Lossless Recording are useful if you need extremely high quality recordings, but be aware that the files will be huge.

If you’re using x264 encoding, you’ll need to set these values manually. There’s no one perfect setting, as the best bitrate depends on your screen size and setup. For 1080p recording at 60FPS, you can start with something like 40,000kbps and adjust from there.

It’s a good idea to try these options to see which provides the best balance of quality and file size. Try recording a minute of typical footage, then use that to estimate how large of a file you’ll end up with.

OBS Output Advanced Options

The Best Streaming Settings in OBS

The Output tab is also home to the Streaming section of options. In Simple mode, you’ll simply need to specify a bitrate, choose between software or hardware encoding, and set the Audio Bitrate.

Twitch recommends certain streaming bitrates depending on quality. 1080p at 60FPS should use a bitrate of at least 6,000, while 720p at 30fps can use something around 3,000. For the audio bitrate, 160 is a good baseline. You can increase this to 192 for better quality, or 320 if you need top-notch audio.

If you want to dive into the Advanced mode, you’ll find options similar to the Streaming tab as discussed above. Users with a graphics card encoder can pick Twitch Streaming from the Preset box as a baseline.

In case you’re using the software encoder, you’ll need to enter the bitrate manually. Use CBR (constant bitrate) for streaming, as VBR (variable bitrate) is inconsistent.

OBS Streaming Options

You may wish to lower the bitrate (as well as downscaling the resolution and lowering the FPS if needed) slightly for streaming. A stable, lower-quality stream that everyone can enjoy is better than streaming in maximum quality and having your internet connection struggle to keep up.

Helpful tips for fixing low FPS in games apply here, too. Check out Twitch’s broadcast requirements page for more information.

How to Record Your Screen With OBS Studio

Once you’ve set everything up, to begin screen recording, all you have to do is click Start Recording on the main OBS Studio page. The software will immediately start recording based on the current Scene. You can swap Scenes at any time, so make sure you’ve set them up beforehand.

When you click Stop Recording, OBS Studio will save your file to the directory you specified in Settings. As mentioned earlier, we recommend performing a short test recording first to make sure everything looks and sounds acceptable.

How to Stream Using OBS Studio

To stream with OBS Studio, you’ll first need to connect OBS with your streaming account. Do this by opening Settings and switching to the Stream tab. Under Service, choose your preferred site. You’ll find Twitch, YouTube Gaming, Mixer, and more.

OBS Streaming Account Connect

Next, you’ll need to generate a streaming key for the service. Click the Get Stream Key option in OBS to jump right to the appropriate page for your service. To do this with Twitch, for example, head to the Stream Key page in Twitch’s Settings (Settings > Channel and Videos) while logged in. Click Copy and paste this into the Stream Key field in OBS Studio.

Warning: Never give this stream key to anyone or show it on a stream! Anyone with access to this can stream to your account. If you accidentally share it, click Reset to generate a new one.

You’re Now Ready to Record and Stream With OBS Studio

Now you have a basic understanding of how to use OBS Studio. You can customize it a lot more to suit your own personal needs, but this overview is designed to prepare you to record gameplay locally and/or run your first stream.

If you don’t want to bother with OBS, here’s how to record your Windows screen without any extra software.

Read the full article: How to Record Your Screen and Stream With OBS Studio


from MakeUseOf https://ift.tt/2CWJWub
June 26, 2020

10 Computer Programming Careers and Jobs That Are in High Demand

programming-jobs

Programming jobs are in demand and the industry is booming with opportunities. You can have a long-lasting programming career if you work hard. While some say the industry is saturated, career opportunities are plentiful.

But not all coding jobs are equal. There is considerably more demand for some jobs than others. Knowing which jobs are in demand gives you a headstart on a successful programming career.

Since landing a programming gig can be tough, consider focusing on one of these fields to increase your chances of landing a coding job.

Here are 10 types of computer programming jobs that are in high demand.

Coding Jobs: Software Development

Computer code example for programming jobs

Software development is a massive field with plenty of career opportunities. When searching for a software developer job, keep an eye on these openings.

1. Software Engineer

Software engineers are responsible for developing full-scale applications. They are sharp coding minds who are comfortable with algorithms, structure, and design. Software engineers are in-demand thanks to numerous well-paying fields.

Finance programmers develop systems that drive the worlds’ financial markets. You can make a good living coding for enterprise firms that use older programming languages like COBOL. Since these languages are not prominent anymore you can demand a hefty salary if you’re savvy.

Of course, these are specific examples. There are thousands of jobs available! Software engineering jobs might use languages like C, C#, Python, Java, Ruby, and C++. On average, software engineers command a healthy salary.

2. Cloud Engineer

Cloud programming is the practice of developing and maintaining code used for cloud architecture. As a cloud engineer, you may have to design infrastructure or debug systems hosted on a remote server. This is a field that became critical when cloud servers became mainstream.

Cloud engineers should be comfortable with a service like Amazon Web Services (AWS) or Microsoft Azure. It’s a complex field, and commands a healthy wage as a result. It’s good to have experience with database, API, and DevOps development if you want to pursue this career.

3. Database Developer

Any software solution that involves data uses databases to store that information. Smart database design is necessary to optimize performance and make sure that data can be easily accessed by a program.

Databases are mission-critical for large scale apps, so dedicated database developers get hired.

If you decide to specialize in databases, you can work with two types of databases. Relational databases like SQL and MySQL often feature in enterprise businesses and are known for their stability. Non-relational databases like Mongo and NoSQL are more popular for serving data to web apps and mobile apps.

Coding Jobs: Artificial Intelligence

Programming artificial intelligence is one of the highest paying coding careers you can find. There’s a robust job market, companies in need of talent, and a high barrier for entry. If you’re passionate about creating the future of software this may be the career for you.

4. Machine Learning Engineer

Curious about CAPTCHAS? Wonder how Amazon seems to know the right products to suggest when you’re shopping? The programming behind these smart services is machine learning.

Machine learning is a category of artificial intelligence that provides systems with algorithms that they can use to learn information without being coded. Machine learning engineers write code that feeds data into computers to allow them to predict outcomes based on data.

These engineers will manage the data as well as the programs. It’s an exciting field with new innovations. Companies like Amazon, Apple, and IBM are using machine learning to create advanced technologies. You’ll need advanced education to be a machine learning engineer, but the skills are coveted.

5. Deep Learning Engineer

Deep learning is a very advanced form of machine learning. This field of coding produces technologies like facial recognition software, self-driving cars, and speech recognition programs like Siri. It uses a significant volume of data to build programs called neural networks, which gives computers the power to make decisions.

This form of artificial intelligence is the next step up from machine learning, so you can expect a higher salary.

6. Data Scientist

If you’re naturally analytical, organized, and stats-driven you may enjoy data science.

Data scientists are responsible for managing incredible volumes of data, and making determinations based on this data.

Data scientists are as skilled at programming as they are statistics. It’s a field driven by math, so understand this before you begin pursuing this career. Data science uses languages like R, Python, and SAS to engineer solutions.

Mobile Development

7. Mobile Developer

Mobile development apps

You’ve probably got a smartphone; you might even have more than one. Whether you have an Android device or an Apple product there are apps, games, and operating systems that need programming. Mobile developers are in high demand to fulfill this need.

There are plenty of paths you can take if you choose this coding career. You can code for Android or iOS. You can write productivity apps, games, or code for operating systems. The popularity of tablets has increased the need for programmers who can code in these mobile formats. Mobile developers code apps in Java for Android and Swift for iOS.

Coding Jobs: Web Development

8. Front End Developer

PHP code example for web programming jobs

A front-end developer brings web apps to life. These coders implement the look of a web app and the functionality that makes it dynamic. Front End Developers are masters of HTML, CSS, and JavaScript. If you enjoy building gorgeous web apps that are easy to use, you will enjoy this type of programming.

Front End Devs are in-demand thanks to the sheer volume of web apps that are a part of day-to-day life. There is no sign of slowing down, so there are plenty of jobs to pursue.

A veteran front-end developer is comfortable with frameworks like ReactJS, can manage version control, and can use content management systems (CMS) like WordPress.

9. Back End Developer

A back-end developer deals with the logic and data of a web app. The design, layout, and interactive features on a web app are coded by front-end programmers. Back-end developers are concerned with how a web app interacts with a server, and how the information gets loaded by the app. It’s the technical side of web development.

Every web app needs someone capable of scripting the server code.

Common languages and frameworks include PHP (Laravel), Python (Django), JavaScript (Node.js), and Ruby (Ruby on Rails). Developers can get caught up in choosing front-end vs. back-end development, so be sure to do research to help you make the right choice.

10. UX Developer

Some apps are so clunky and frustrating that they tire you out. Chances are you wouldn’t use such an app again if you had another option. User Experience (UX) developers solve this problem.

A UX developer is a programmer who manages how apps functionally work. It’s a job that requires analytical thinking as well as creative passion. You have to understand how someone might interact with the app, not just how to code an app.

UX developers need to be fluent in HTML, CSS, and JavaScript just like a front-end developer. You should be proficient with wireframing tools, and design tools like Adobe Illustrator. If you have a background in web design or front-end development you’re ahead of the curve.

Jumpstart Your Programming Career

These 10 programming jobs are in high demand and give you unlimited potential if you put the work in. If any of these jobs immediately piqued your interest you should look deeper into it. Personal interest can help motivate you to become an expert in a coding field.

Once you’ve built a portfolio in any of these paths you’re on your way to becoming a career programmer. You can sharpen your skills with some coding challenges that can ultimately lead to jobs. Major companies will want to see your portfolio of projects before, or during, a job interview. Give yourself a leg up with a professional portfolio, and land the programming career you’ve always wanted.

Read the full article: 10 Computer Programming Careers and Jobs That Are in High Demand


from MakeUseOf https://ift.tt/2DxrOos
June 26, 2020

20 Essential Photography Accessories for Beginners and Newbies

photographer-accessories

We’d love to say that photography is all about your talent, vision, and creativity. However, that’s only part of the process. You also need the right equipment to get the best results. There’s a lot to consider when you first take up photography.

Once you’ve chosen your camera and lens, you’ll need some of the photography essentials to go alongside them. So, to save you time and make things easier, we’ve rounded up the best photography accessories for beginners.

1. Tripod

Vanguard Alta Pro 263AB 100 Vanguard Alta Pro 263AB 100 Buy Now On Amazon $134.76

A tripod stabilizes your camera and prevents your photos blurring as a result of shaky hands. Tripods are essential if you ever want to do low-light or long-exposure photography. Slower shutter speeds and smaller apertures also require a tripod.

The Vanguard Alta Pro 263AB 100 is a beginner photography must-have. This mid-range tripod can be adjusted to multiple angles, has a 360-degree rotating head, and is made of lightweight aluminum, so it’s easy to carry around with you.

2. External Flash

YONGNUO YN560 IV YONGNUO YN560 IV Buy Now On Amazon $75.00

If your camera has a built-in flash, turn it off and never use it again. In almost every situation, you want the light to point in from another direction than the camera itself. Even a few inches above or to the side of the camera can make a huge difference.

An external flash, like the YONGNUO YN560 IV, mounts to the top of your camera and, depending on what kind you get, can swivel or tilt to aim the light. For example, you can point it upwards and bounce the light off the ceiling to get downward shadows.

3. Flash Diffuser

Altura Photo Flash Diffuser Altura Photo Flash Diffuser Buy Now On Amazon $12.99

A flash diffuser is a transparent cap that covers an external flash. Whereas direct flash lighting can be harsh and create hard and unsightly shadows, the diffuser scatters the light and softens shadows. However, keep in mind that it also weakens the light and shortens its travel distance.

You’ll need a diffuser designed to fit your specific flash model unless you get a larger softbox. Universal models like the Altura Photo Flash Diffuser are an attractive option, so long as the device is compatible with your camera.

4. Rechargeable Flash Batteries

Energizer Recharge Pro Energizer Recharge Pro Buy Now On Amazon $17.06

AA batteries power most external flashes, and there’s nothing worse than pulling out your flash for a shoot and finding it dead. Ideally, you’d carry enough extra batteries to refill all of your flashes plus two backup sets. This is crucial as flashes require a lot of power and drain batteries in no time at all.

To save yourself money, and protect the environment, you should opt for rechargeable AA batteries. The Energizer Recharge Pro is a portable charging case for AA and AAA batteries that comes with four AA batteries included.

5. Additional Camera Batteries

RAVPower NP-FW50 RAVPower NP-FW50 Buy Now On Amazon $25.36

Your DSLR likely uses a rechargeable battery, too. However, the manufacturer will have included their own unique power source rather than a standard AA battery. As such, you won’t be able to swap just any battery into your camera.

Before you head out, you should be sure to have replaceable pre-charged batteries ready to go. Units like the RAVPower NP-FW50 can recharge multiple batteries simultaneously, in this case for the Sony A6 range, and can be topped up on the go with a power bank thanks to the included USB port.

6. Gray Card

Anwenk Grey Card Anwenk Grey Card Buy Now On Amazon $9.98

A gray card is a simple tool to ensure your shots get a consistent level of gray, white balance and exposure. When a digital camera meters light for exposure, it aims for 13 percent gray. You can purchase a 13 percent gray card, but you’ll also want an 18 percent card, as it takes reflected light into account. The Anwenk Grey Card, a collection of three color-calibrated cards, for example, is one of the best photography essentials for beginners.

These cards reduce the amount of time you have to spend adjusting exposure for each scene. You can also use the gray card to achieve proper white balance. At the start of every shoot, snap a normal shot of the gray card. When post-processing, you can use that gray as the basis for white balance, and apply those white balance settings to the rest of the shoot.

7. Camera Cleaning Kit

Altura Photo Professional Cleaning Kit Altura Photo Professional Cleaning Kit Buy Now On Amazon $13.99

Even a single speck of dust on your lens can ruin your shots, so regular cleaning is essential. However, to prevent damage, you need to use sensitive tools and materials.

A camera cleaning kit is ideal for this and usually comes with everything you need to maintain your DSLR. We’d recommend the Altura Photo Professional Cleaning Kit, which is the best all-around DSLR cleaning kit available right now.

8. Alternative Lens

Canon EF 50mm Lens Canon EF 50mm Lens Buy Now On Amazon $92.00

Many veteran photographers recommend that amateurs get the so-called nifty fifty 50mm lens, like the Canon EF 50mm Lens, but that advice has full-frame cameras in mind. If you have a cropped sensor, which is true for most entry-level and enthusiast cameras, you’ll want something closer to 30mm.

However, 50mm lenses are some of the cheapest lenses, while 30mm options can be pricey. When you’re just starting, you don’t need anything better than f/1.8. When you progress into a more experienced photographer, then you can upgrade to f/1.4 or even f/1.2.

9. Neutral Density Filters

K&F Concept Natural Density Filter K&F Concept Natural Density Filter Buy Now On Amazon $32.99

A neutral density filter, like the K&F Concept Natural Density Filter, mounts onto a lens and reduces the amount of light coming in. This is fantastic for when you want to shoot in the sun with a wide aperture without a super-fast shutter speed. By artificially darkening the outdoors, you have more creative range.

Neutral density filters can also be graduated, with half of the filter being darker than the rest. This comes in handy for landscape photography in scenarios where you want to darken the bright sky without darkening the beautiful foreground. However, be sure to get a filter that matches the size of your lens.

10. Polarizing Filters

AmazonBasics Circular Polarizer AmazonBasics Circular Polarizer Buy Now On Amazon $12.99

A polarizing filter mounts onto a lens and reduces the amount of light coming in from a specific direction. For example, if you’re getting a glare from the sun or your photo is being affected by glinting reflections on water, a polarizing filter will mitigate them.

This makes polarizing filters an essential purchase if you do a lot of nature photography. The AmazonBasics Circular Polarizer, for example, is a great value option. Although, make sure the polarizer has the same diameter as your lens threads.

11. Remote Shutter Release

Neewer Shutter Release Remote Control Neewer Shutter Release Remote Control Buy Now On Amazon $24.99

A remote shutter release lets you snap shots on your camera without actually touching the body itself. It pairs extremely well with any kind of photography that requires a tripod, namely low-light and long-exposure shots.

But it’s also useful for when you want to photograph yourself, especially if you get a wireless one. The Neewer Shutter Release Remote Control is designed for Canon DSLRs and comes with an LCD screen, too. However, there are a variety of controls for each camera manufacturer.

12. Memory Cards

SanDisk 128GB Extreme SDXC SanDisk 128GB Extreme SDXC Buy Now On Amazon $24.65

As you sharpen your photography skills, you’ll likely switch from JPEG to RAW shots. However, RAW images are far larger than standard photos, which means they also take up more storage space.

The last thing you want is to run out of space when you’re out shooting, so always keep several extra memory cards at hand. The SanDisk 128GB Extreme SDXC is an inexpensive option, so you could buy a couple so that you have some spare should the need arise.

13. Photography Bag

Qipi Camera Bag Qipi Camera Bag Buy Now On Amazon $29.99

You’ll have noticed that photography requires a lot of accessories. In addition to your camera, you may have several flashes, lenses, filters, memory cards, and batteries.

A photography bag, like the Qipi Camera Bag, makes it easier to carry all your beginner photography essentials with you and keep them organized.

14. Bounce Reflectors

Neewer Photo Studio Lighting Reflector Neewer Photo Studio Lighting Reflector Buy Now On Amazon $61.99

To improve results, especially as a professional, you can use a bounce reflector. These allow you to take existing light sources and redirect them onto the subject, perhaps to highlight certain features or soften shadows.

One of the best DSLR accessories for beginners, then, is the Neewer Photo Studio Lighting Reflector. This model comes with a stand, but check before you purchase other reflectors, as you may need an assistant or a reflector stand to hold it.

15. Flash Light Stand

Neewer Heavy Duty Light Stand Neewer Heavy Duty Light Stand Buy Now On Amazon $28.99

When you first start, your flash will likely be mounted to your camera. However, as you progress your skills, you may want to install the flash on a stand, so you can position it anywhere and aim it for optimal results. For instance, the Neewer Heavy Duty Light Stand is an all-round excellent flash light stand.

16. Flash Umbrella or Softbox

Emart Flash Umbrella Kit Emart Flash Umbrella Kit Buy Now On Amazon

A flash diffuser is a great place to get started, but you can level up with a shoot-through flash umbrella like the Emart Flash Umbrella Kit.

This turns your small flash unit into a significant light source. A softbox, on the other hand, is similar to an umbrella, but with less light spillage.

17. Flash Snoot

Neewer Conical Snoot Neewer Conical Snoot Buy Now On Amazon $18.19

Another lighting accessory worth considering is the flash snoot. This is a flexible tube that fits over your flash unit, concentrating light in one specific direction.

This eliminates spillage, allowing you to light subjects in dark environments without residual light, for example. An affordable option is the Neewer Conical Snoot.

18. Camera Strap

Peak Design Camera Strap Peak Design Camera Strap Buy Now On Amazon $49.95

Your camera probably came with a basic strap. However, over long periods, these can get quite uncomfortable or distribute the weight poorly. As a result, it’s better to invest in a proper strap as soon as you can.

This will help to balance the weight and minimize shoulder stress. The Peak Design Camera Strap, for example, helps carry loads up to 90kg.

19. Specialized Lenses

Big Mike's Telephoto Lens Big Mike's Telephoto Lens Buy Now On Amazon $119.99

As you refine your skills, you’ll likely figure out the type of photography you enjoy, and different scenarios require different lenses. For example, if you want to shoot wildlife photography, best to invest in a telephoto lens. Live events? You’ll need a high-quality zoom.

If you own a Canon DSLR, you should consider the Big Mike’s Telephoto Lens. However, given lenses can often be as or more expensive than the camera unit itself, it’s best to research thoroughly before making a purchase.

20. Business Cards

Avery Ink-Jet Printer White Business Cards Avery Ink-Jet Printer White Business Cards Buy Now On Amazon $6.21

As soon as you decide to go professional or semi-professional, business cards should be printed, ready to go, and carried with you at all times. You never know when an opportunity for business exposure might arise, and you’ll want to take advantage of every single one.

It’s an upfront investment, but a worthwhile one. However, if you don’t want to shell out for pre-printed options, opt for the Avery Ink-Jet Printer White Business Cards, and you can print your own at home. Ultimately, the cost is minimal when compared to the price of photography gear.

The Best Camera Accessories for Beginners

Capturing the perfect shot requires your skill and creativity. You can further improve your images by choosing the right gear for your needs as well. These photography essentials for beginners are a great place to start, but don’t rush out to buy them all in one go—you can purchase each as the need arises.

That said, you won’t always have your full camera setup with you when inspiration strikes. However, you can utilize your photography skills with your smartphone’s camera. Just be sure to install these essential smartphone photography apps before you head out.

Read the full article: 20 Essential Photography Accessories for Beginners and Newbies


from MakeUseOf https://ift.tt/2Dd1iAy
June 26, 2020

Creative Unveils SXFI TRIO USB-C Wired Headphones

There’s a lot to like about wireless headphones—the long battery life, lack of cable clutter, and ease of use. However, even some of the best wireless headsets aren’t ideal for audio reproduction.

If you’ve been looking for a wired set of USB-C headphones, you should check out the newly-launched Creative SXFI TRIO.

What Are the Creative SXFI TRIO?

Creative SXFI TRIO wired headphones

The Creative SXFI TRIO are a set of wired headphones suitable for your phone and laptop. That may sound unremarkable; after all, we’ve been using wired headphones for decades now. However, the SXFI TRIO are equipped with a USB-C connection rather than a traditional 3.5mm jack.

Previously, our devices had to translate digital audio signals to an analog variety that our headphones could broadcast. The USB-C connection found here means that no conversion has to occur, resulting in higher audio quality.

These in-ear headphones are designed to fit snuggly inside your ears. So, although there’s no noise-cancellation included, they can form a seal to isolate you from external sounds. There are six sets of tips in the box, so you can find the size which works best for you.

Creative SXFI TRIO Features and Availability

Creative SXFI TRIO wired headphones resting on a laptop

There are audio controls integrated into the cable so that you can enable features and control music playback. The cable itself is made from Kevlar-reinforced copper and wrapped in a nylon braid for durability. The headphones have a triple driver system for a well-balanced audio output.

This is coupled with Creative’s Super X-Fi Audio Holography. The technology recreates a studio, theater, or high-end speaker environment in your headphones for immersive sound. This also applies when using the headset on calls, so it sounds as though all participants are in the same room.

Wired Headphones Are Still an Option

The Creative SXFI TRIO are available now from Creative’s online store for $139.99.

Although many people have made the switch to wireless headphones, there’s still a sizeable demand for wired headsets. Depending on the set you choose, you may find they offer higher quality audio and are often cheaper than their wireless counterparts.

Android users have a wide range to choose from, but Apple users are more limited. If you’re after a wired set for your iPhone, check out the best wired headphones with lightning cables.

Read the full article: Creative Unveils SXFI TRIO USB-C Wired Headphones


from MakeUseOf https://ift.tt/2NskFfp
June 26, 2020

20 Quick Web Games to Play Online When You’re Bored

web-games-short

If you’re bored or have a bit of time to kill, playing a web game is the perfect way to keep you entertained. To help ease the boredom, we’ve put together a list of the best quick web games to play online when you’re sat twiddling your thumbs.

These addictive games are small and require no commitment or registration. While they’re so fun you won’t want to stop, they’re lightweight enough that you can move on from them at a moment’s notice if necessary.

Here are the best quick web games to play online when you’re bored.

1. QWOP

QWOP

QWOP is a legendary web game. The goal is simple: successfully run 100 meters. Except, doing that is anything but simple, as you have to manually control the thighs and calves of the runner. Don’t be surprised if it takes you a while to get off the start line, but at least you’ll have a laugh doing it.

2. Entanglement

Entanglement

Entanglement is the perfect game to play when you’re stressed, even if you don’t like puzzle games. The goal is to create the longest path through tiles you place down. These tiles are randomly generated, but offer enough options that it isn’t frustrating. Plus there’s some lovely soothing background music.

3. Gridland

Gridland

Gridland is a match-three game with a twist. There are two phases: day (where you match and gather resources to build your village) and night (where you match to fight off invading monsters). Time only progresses when you make a move, so it encourages smart planning and thoughtfulness. It’s extremely clever, but more importantly, a ton of fun.

For more like this, check out these cool puzzle games you can play in your browser.

4. Cookie Clicker

Cookie Clicker

The concept of Cookie Clicker is so banal, you can only truly understand it once you start playing. The ultimate aim is to produce as many cookies as possible. You do that by clicking a cookie. That’s it. You can then trade the cookies in at the store to buy power-ups to automate tasks, like a reinforced cursor or a grandma.

5. Threes

Threes

Threes is a popular mobile game that has been turned into a web game. You slide numbered tiles on a four-by-four grid to combine them into multiples of three. The aim is to earn the highest score by stacking and achieving rare tiles. Though it seems simple in concept, it’s delightfully difficult to keep games going more than a few minutes until no moves remain.

6. The Wiki Game

The Wiki Game

Wikipedia is a treasure trove of interesting information. And The Wiki Game makes use of the free online encyclopedia by challenging you to travel from one Wikipedia page to another by using the internal links on the page. It also times you based on how easy the challenge is.

For example, getting from the start page of The Pacific War to the end page of Sea is relatively easy. On the other hand, moving from Electric Chair to HTML is a bit trickier.

7. Line Rider

Line Rider

Line Rider is such a popular web game that it got turned into Nintendo DS and Wii titles. You don’t need those consoles though because it can be played directly in the browser. Use your cursor to create lines, which the little figure will then ride along. Get creative as you can by drawing loops, ramps, and insane jumps.

8. The Floor Is Lava!

The Floor is Lava

The Floor Is Lava! is exactly what it sounds like: there’s lethal lava below that you avoid by launching yourself towards your mouse cursor. But there are other players too, and it’s a bit like bumper cars; if you hit them, you bounce back. It’s tough to stay alive, but lots of fun! Each game lasts less than a minute, but you’ll want to keep playing again and again.

9. Quick, Draw!

Quick, Draw!

Quick, Draw! is not only a game, but also a way of training a neural network. You are presented with a word and then get a short amount of time to doodle it. As you draw, the system will try to guess what it is based on machine learning. Your drawing will then be used to help train the machine in the future.

10. Frogger

Frogger

Frogger is a classic 1980s arcade game. It’s had loads of sequels through the years, but the original still holds a lot of charm. This web game is a recreation of the original. If you’ve never played Frogger, you need to correct that. The object is to hop your frog to the other side, avoiding traffic on the road and a hazardous river.

11. Free Flow Colors

Free Flow Colors

Free Flow Colors has hundreds of levels to keep you entertained for many visits. In the game, you must pair colors together by drawing lines between them. You also need to have the entire board covered. The only problem is, if any of the lines cross then the move is invalid. Simple yet addictive.

12. Slime Volleyball

Slime Volleyball

Slime Volleyball is an old online game, but it stands the test of time. You can either play against the computer or a friend. You control a little blob—or slime—as you hit a ball back and forth across a net. Should the ball touch the ground on your side, it’s a point to the opponent. The Slime series expanded into other sports, but volleyball remains the best.

13. Cursors

Cursors

Cursors turns your mouse cursor into a character, and your aim is to escape the maze. But you aren’t alone! You share the world with everyone else playing the game, and some of the puzzles require cooperation and coordination.

14. Helicopter

Helicopter

In Helicopter, you use your mouse to control a chopper and dodge incoming obstacles. Click to let the helicopter rise, stop to let it fall. This is an endless game that speeds up and gets frantic. Since it records a score every play, it’ll give you that addicting “just one more turn” feeling as you try to beat yourself.

15. A Dark Room

A Dark Room

A Dark Room is one of the most notable clicker games because it isn’t just a clicker game. It’s infused with role-playing and narrative elements that elevate the experience into something greater. It starts off slow, but stick with it. It’ll be worth it.

16. Mackerelmedia Fish

Mackerelmedia Fish

If you like the weird and wonderful, Mackerelmedia Fish is for you. It’s an interactive experience that guides you through a fictional retro web. The aim of the game? Well, that’s one to discover for yourself. This is a hilarious and wonderfully animated game and the less you know about it before you go in the better.

17. Sinuous

Sinuous

In Sinuous, you are your mouse cursor. Avoid the endless torrent of red dots, touch the green dots for invulnerability, and see how long you can last. The game is highly replayable and excellent for short 5 to 10 minute bursts.

18. slither.io

slither.io

Slither.io is a fun and colorful online game where you control a snake in a neon landscape, sliding into glowing orbs to grow your length. The challenge is that you’re playing against others, some of whom are longer than you. They can envelop you and make themselves longer. Of course, you can do the same thing to smaller snakes. See how big you can get.

19. Books Tower

Books Tower

The objective of Books Tower is to stack as many books as possible without the tower topping over. Each new book glides from left to right and you need to click when you want it to drop. Time those clicks perfectly to align the books, otherwise it’s all going to come tumbling down.

20. The Jigsaw Puzzles

The Jigsaw Puzzles

The Jigsaw Puzzles is home to thousands of free online jigsaw puzzles, from categories like animals to nature, ranging in difficulty from 50 to 150 pieces each. Perhaps not as satisfying as completing a real puzzle, but it’s still an enjoyable way to spend 15 minutes.

Mobile Games to Play When You’re Bored

These are some of the best quick web games to play when you’re bored and want to pass the time. And the chances are you’ll find them so entertaining that you’ll come back to play them time and time again.

However, as fun as web games are, there are even more options on your smartphone. So, for some fun when you’re on the go, check out these addictive mobile games you can play for five minutes at a time.

Read the full article: 20 Quick Web Games to Play Online When You’re Bored


from MakeUseOf https://ift.tt/2E6yA3R